
The photograph above manipulated the white balance to have the photo appear more blueish, courtesy of Pen Waggener.
In taking a photography class, I’m learning how to not just make a photo bluer, but also how to make a water bottle look interesting. My instructor Patricia explains it’s all about the art of seeing.
“I have an exercise for you,” she says. “Pick any subject and try to photograph it 40 different ways. If you’re photographing a bottle of water, after 10 shots you’ll probably be thinking ‘well, what’s next?’ but there’s always something else you can do. You’ll begin to see things in a different way.”
Another tip she provides for becoming great at photography is taking pictures of what you enjoy. As a portrait and event photographer, she realized that taking pictures of poverty and more somber scenes just didn’t make her feel good, so she doesn’t do it. This made photography easier to pick up.
“If you do things with your heart it will all click eventually,” she smiles.
We begin the class with a quick review of ISO, aperture and shutter speed — as these are the three elements that will affect how exposed or underexposed your photo is, as well as other elements like depth of field (aperture) and motion in action (shutter speed).
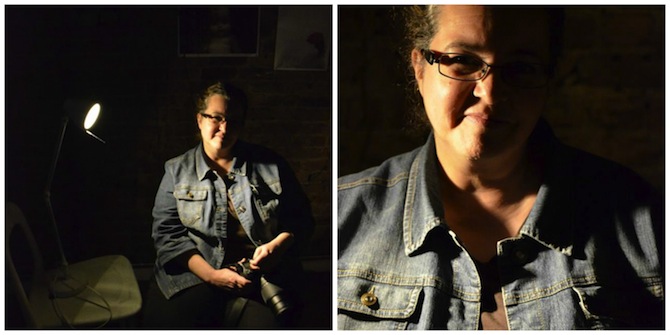
Testing out shutter speed in tricky lighting situations.
Camera Shake
From there we get into the topic of camera shake. Many times when a picture comes out blurry time and time again it isn’t because your camera isn’t good, but because you haven’t set your camera to the proper shutter speed.
“You have to think to yourself, ‘what am I doing this for?” Patricia explains. “For example, if it’s for an event they’ll want sharp images of smiling people.”
According to Patricia, the longer the focal length of the lens the more prone the camera will be to camera shake. While there are general rules of thumb — 1/60 shutter speed for a willing subject, 1/25 for an event with people chatting and 1/250 to photograph actions like kids running around — another tip is to multiply your focal length by two and put it as the shutter speed denominator. For example, if your focal length is 50 millimeters having a shutter speed of at least 1/100 is a good idea.
It’s important to know your lens’ limits. For example, concerning my 17-50 mm lens I should never have a shutter speed under 1/40 (approximately 17 times 2).
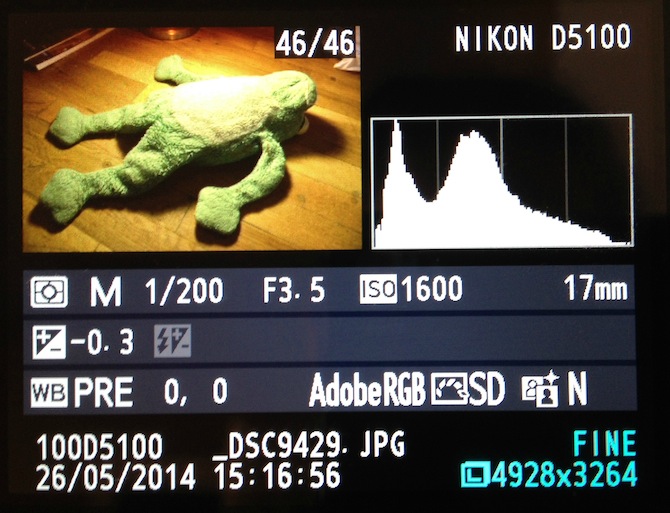
A look at the histogram on the back of my Nikon D5100
The Histogram
While your LCD monitors can tell you a lot about your exposure, a better tool is your histogram. This is also a better tool than your eyes, as your eyes see brighter than the camera does. The histogram will show us the brightness values of all the pixels in an image which is the best the best way to know if an image is correctly exposed.”
The histogram on my Nikon D5100 is separated into three sections: the shadows, the midtones and the highlights (note: the histogram will look a bit different depending on your camera; however, it will be the same general principal). When you have a lot of information in the shadows it means the photo is underexposed and vice versa. For the most part, you’ll want a photo that has information in every section of the histogram.
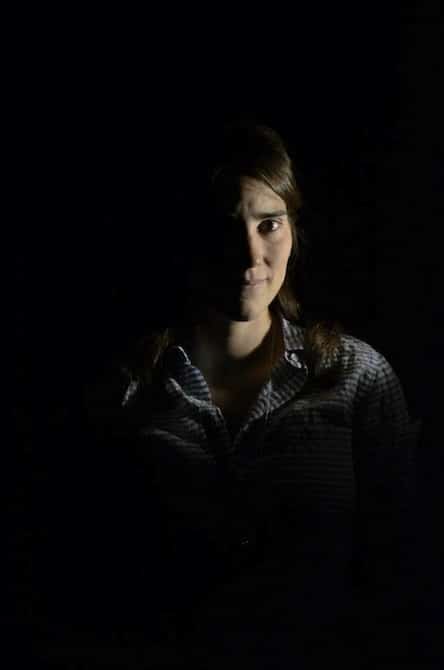
That being said, there is no perfect histogram. It all depends on what you’re going for, as you might want a photo to be under or overexposed. Again you need to think about what you’re going for. For example, in the above photo I took of Patricia during our private lessons, I was purposely going for a shot that had a lot of shadows.

The Middle Gray
It was now time for our next exercise, one that would involve the black construction paper and white mint that had been mysteriously placed in front of us at the beginning of class.
“What if I said that if you took a photo of this black construction paper it would come out gray? Would you believe me?”
Of course I would believe her — although it did seem odd; however, I’d taken private lessons with her and had seen her in action. She knew her stuff.
To truly understand the composition of a photo and how your camera reads a scene, we need to discuss the topic of “middle gray.” When your camera exposes a scene, it sees things very differently from the human eye. In fact, it sees the scene in tones of gray. The camera’s exposure indicator will measure how much light overall is reflected from the scene captured in the viewfinder. The camera doesn’t see all the details of the scene like the human eye does, but instead averages the brightness of the scene to come up with a suggested exposure. What the indicator deems as “0″ (neutral) becomes the middle gray or 13% reflectance in visible light – perceived as right in the middle of white and black.
While for most scenes this works out well, there are scenarios such as being at a beach, in the snow or in a very shadowy area where your camera’s suggestion for the exposure indicator will be wrong. In this instance, you’ll need to decide if the highlights or shadows are more important, and expose for that. In these instances you’ll want to fine tune your exposure, which we’ll get to shortly. Essentially, if the subject of your picture is actually lighter or darker than middle gray, your photos will not be accurate with the factory settings.
For the exercise we are instructed to set our exposure indicators to neutral and focus on the black paper (we had to do it manually as there’s not enough contrast on a plain black sheet for the camera to focus on on its own). When I took the photo, it came out surprisingly light gray, with the histogram only showing midtones. When I shot the paper with a white mint it added lots of highlights, with the paper slightly darker but still very gray. Next I added my black lens cap next to the mint, and my histogram got a lot of information in the shadows. Because the exposure indicator was setting the black paper as the midtones or middle gray, the colors in the photo were inaccurate.
During these types of tricky situations you’ll need to fine tune your exposure to manually over or underexpose the photo for accuracy, using the histogram to help guide your actions.
Mastering the art of fine tuning exposure
Fine Tuning Your Exposure
There’s a technique to fine tuning your exposure: first, expose to neutral. Next, try two “clicks” — or thirds of a stop — to the right and two to the left. You can fine tune your aperture and shutter speed, and sometimes even your ISO (depending on your camera).
This is where we get mathematical. The language of the camera is stops, with one stop equivalent to 3/3. For aperture the main numbers to remember are 1 and 1.4. If you keep doubling these you can get all of the standard stops on the scale. For instance, if your aperture begins at 1.4 then next will be 2 (1+1), followed by 2.8 (1.4+1.4), then 4 (2+2) and so on.
For shutter speed, the critical number is 2. If you divide or multiply a number by two you’ll (roughly) move one full stop more of less. For example, if you’re at a shutter speed of 1/30, the next stop is 1/60. Therefore, if you change your shutter speed from 1/30 to 1/60 you’re letting in half as much light (the faster shutter speed means there is less time for light to enter the camera), while if you switch from 1/60 to 1/30 you’re letting in twice as much light (the slower shutter speed means there is more time for light to enter the camera). Keep in mind that faster shutter speeds are usually desired for freezing action, while slower shutter speeds allow for some motion blue.
Not all cameras allow for the ISO to be fine tuned. You can see if yours can by looking at the ISO numbers listed. The main ISO amounts are derived when the previous is multiplied by two, for example: 100, 200, 400, 800, 1600, 3200. Check to see if there are any numbers in between these. If there are, then your ISO can be fine tuned, as you’ll have the ability to add just a “teaspoon of light.”
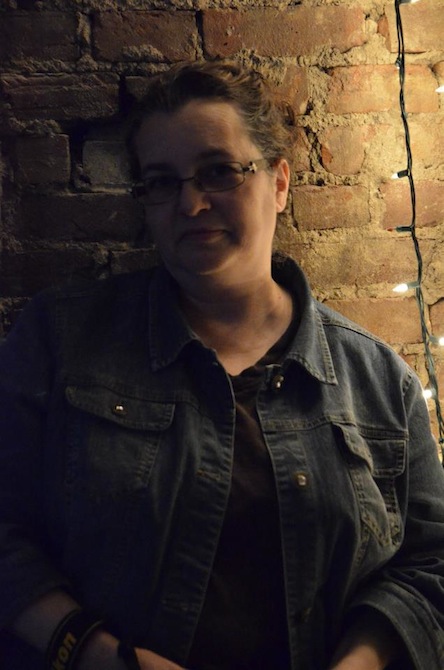
To put the idea of fine tuning exposure into perspective, Patricia separated the class into groups of three and photograph each other lit by a lamp. We first set our exposure to neutral before taking the shot, checking the histogram and fine tuning to add more or less light. With each photo taken, we were to check for clipping and shadowing in the histogram before fine tuning as needed. To get the final photo shown above, I exposed for my subject’s lit cheek to make that the midtone of the photo. If I would have exposed for her entire face, there would have been much more information for the exposure indicator to try to balance. This activity had the added bonus of letting the person being photographed know what it felt like to be a subject.
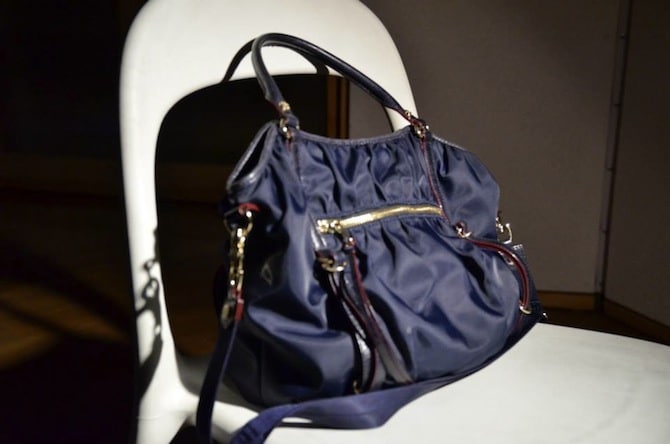
By setting my custom white balance, I was able to capture the true color of the purse in a tricky lighting situation.
Custom White Balance
Sometimes, the problem with a photo is the tones and color temperatures, which is manipulated through our white balance settings. While it’s common to shoot on Auto White Balance, setting a Custom White Balance is often needed when you’re in a place that has multiple light sources producing different color temperatures or when the lighting might negatively affect the way your subject will look. For example, if you’re photographing someone in a room with yellow lights you’re not going to want their skin to appear yellow. In this instance, you would want to set your custom white balance to get more precise colors.
To do this is actually ridiculously easy. You’ll need a 13% grey card — you can purchase this at a photography shop — or, if you’re on a budget, a white piece of cardboard/paper. From there, set the paper fully against the light you’ll be using for your subject without shadows. This reflects the light that falls on your subject, telling your camera what you want neutral or the middle gray to be.
Setting custom white balance. Photo courtesy of Dave Dugdale.
Next, you’ll go into your camera settings and choose Custom White Balance — for my Nikon D5100 it was the “PRE” setting — and take a photo with the card filling up the entire frame. It’s a good idea to set your subject in place and have them hold the paper/put the paper against them so the lighting is exactly how you want it. Once you take the photo your camera should tell you if it’s good or not, and your settings will be saved until you change it.

Jessica Festa is the editor of the travel sites Jessie on a Journey (http://jessieonajourney.com) and Epicure & Culture (http://epicureandculture.com). Along with blogging at We Blog The World, her byline has appeared in publications like Huffington Post, Gadling, Fodor’s, Travel + Escape, Matador, Viator, The Culture-Ist and many others. After getting her BA/MA in Communication from the State University of New York at Albany, she realized she wasn’t really to stop backpacking and made travel her full time job. Some of her most memorable experiences include studying abroad in Sydney, teaching English in Thailand, doing orphanage work in Ghana, hiking her way through South America and traveling solo through Europe. She has a passion for backpacking, adventure, hiking, wine and getting off the beaten path.